以下操作均在AlmaLinux 8 64 环境下测试成功:
命令1:安装依赖并更新
sudo dnf update -y && sudo dnf install -y dnf-plugins-core curl命令2:添加 Docker 官方仓库
sudo dnf config-manager --add-repo https://download.docker.com/linux/centos/docker-ce.repo命令3:安装 Docker 组件
sudo dnf install -y docker-ce docker-ce-cli containerd.io docker-buildx-plugin命令4:启动 Docker 服务并配置用户组
sudo systemctl start docker && sudo systemctl enable docker && sudo usermod -aG docker $USER命令5:拉取 edge-tts-api 镜像并启动 API 服务
docker run -d -p 7899:7899 --restart always jianchang512/edge-tts-api:latest反向代理
要将域名反代到你的 Docker 项目,并使用 Let’s Encrypt 的 SSL 证书并自动维护,你可以使用 Nginx 作为反向代理,并配合 Certbot 来管理 SSL 证书。以下是详细步骤:
步骤 1:安装 Nginx 和 Certbot
1. 安装 Nginx:
sudo dnf install nginx -y2. 启动并启用 Nginx:
sudo systemctl start nginx
sudo systemctl enable nginx
3. 安装 Certbot(用于获取和管理 Let’s Encrypt SSL 证书):
sudo dnf install epel-release -y
sudo dnf install certbot python3-certbot-nginx -y
步骤 2:配置 Nginx 反向代理
1. 创建一个新的 Nginx 配置文件:
sudo nano /etc/nginx/conf.d/edge-tts.conf2. 创建一个新的 Nginx 配置文件:
在文件中添加以下内容,将your-domain-name.com替换为你的域名(提前解析好):
server {
    listen 80;
    server_name your-domain-name.com;

    location / {
        proxy_pass http://127.0.0.1:7899;
        proxy_set_header Host $host;
        proxy_set_header X-Real-IP $remote_addr;
        proxy_set_header X-Forwarded-For $proxy_add_x_forwarded_for;
        proxy_set_header X-Forwarded-Proto $scheme;
    }
}
3. 保存并退出编辑器(按 Ctrl+O,然后按 Enter,再按 Ctrl+X)。
4. 测试 Nginx 配置是否正确:
sudo nginx -t5. 重新加载 Nginx 配置:
sudo systemctl reload nginx步骤 3:配置防火墙(如果启用)
如果你的 VPS 启用了防火墙(如 firewalld),需要允许 HTTP 和 HTTPS 流量:
sudo firewall-cmd --permanent --add-service=http
sudo firewall-cmd --permanent --add-service=https
sudo firewall-cmd --reload
步骤 4:获取 Let’s Encrypt SSL 证书
1. 使用 Certbot 为你的域名获取 SSL 证书:
sudo certbot --nginx -d your-domain-name.com2. Certbot 会自动修改 Nginx 配置文件,启用 HTTPS,并设置证书自动续期。
3. 验证 Certbot 是否配置成功:
访问 https://your-domain-name.com,确认是否能够正常访问并显示 SSL 锁标志。
检查 Certbot 的自动续期任务:
sudo certbot renew --dry-run如果成功,Certbot 会显示类似以下信息:
Congratulations! Your certificate and chain have been saved at:
/etc/letsencrypt/live/your-domain-name.com/fullchain.pem
步骤 5:验证
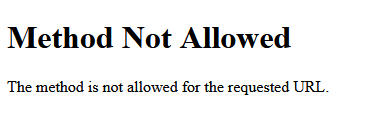
1. 访问 https://your-domain-name.com/v1/audio/speech,确认服务是否正常运行。
浏览器显示如下信息,则表示运行成功!
2. 检查 SSL 证书是否生效(浏览器地址栏应显示锁标志)。
3. 确认 Certbot 的自动续期任务是否配置成功。
重启后的自动运行
Nginx 和 Certbot 的自动续期服务 在 VPS 重启后 会自动运行,前提是你已经正确配置了它们。以下是详细说明:
1. 验证 Nginx 是否已启用开机自启:
sudo systemctl is-enabled nginx如果输出 enabled,表示 Nginx 已配置为开机自启。
2. Certbot 的自动续期是通过 systemd 定时器 实现的。当你使用 Certbot 获取 SSL 证书时,它会自动配置一个定时任务来续期证书。 这个定时任务会在 VPS 重启后自动运行。
验证 Certbot 定时任务:
sudo systemctl list-timers你应该会看到类似以下的输出:
NEXT                         LEFT          LAST                         PASSED       UNIT                         ACTIVATES
Mon 2023-10-09 00:00:00 UTC  8h left       Sun 2023-10-08 00:00:00 UTC  16h ago      certbot.timer                certbot.service
这表示 Certbot 的定时任务已配置。
检查 Certbot 的续期日志:
sudo certbot renew --dry-run如果输出显示续期测试成功,说明自动续期服务正常工作。
API 使用说明:
基础用法
最简单的调用方式:
curl -X POST https://你的地址/v1/audio/speech \
  -H "Content-Type: application/json" \
  -H "Authorization: Bearer your-api-key" \
  -d '{
    "model": "tts-1",
    "input": "你好,世界!",
    "voice": "zh-CN-XiaoxiaoNeural"
  }' --output output.mp3
高级功能
语音情绪控制:
curl -X POST https://你的地址/v1/audio/speech \
  -H "Content-Type: application/json" \
  -H "Authorization: Bearer your-api-key" \
  -d '{
    "model": "tts-1",
    "input": "这是一段开心的话!",
    "voice": "zh-CN-XiaoxiaoNeural",
    "style": "cheerful",
    "speed": 1.2
  }' --output happy.mp3
Python调用示例:
import requests
import json

# 请求参数
request_body = {
    "model": "tts-1",
    "input": "这是Edge TTS的测试",
    "voice": "zh-CN-XiaoxiaoNeural",
    "response_format": "mp3",
    "speed": 1.0,
    # 可以添加其他参数
    # "volume": 0,
    # "pitch": 0,
    # "style": "general"
}

# API请求地址
url = "https://your-domain-name.com/v1/audio/speech"  # 注意要加上 /v1/audio/speech 路径

# 设置请求头
headers = {
    "Content-Type": "application/json",
    "Authorization": "Bearer '可不填'"
}

try:
    # 发送POST请求
    response = requests.post(
        url=url,
        headers=headers,
        json=request_body
    )

    # 检查响应状态
    if response.status_code == 200:
        # 检查响应的Content-Type
        if 'audio/mpeg' in response.headers.get('Content-Type', ''):
            # 保存音频文件
            with open("output.mp3", "wb") as f:
                f.write(response.content)
            print("音频文件已保存为 output.mp3")
        else:
            # 如果返回的是错误信息(JSON格式)
            print("错误信息:", response.json())
    else:
        print(f"请求失败,状态码: {response.status_code}")
        print("错误信息:", response.text)

except Exception as e:
    print(f"发生错误: {str(e)}")
完整的语音支持列表请参考微软官方文档

本文章参考文档:
https://github.com/linshenkx/edge-tts-openai-cf-worker
https://pyvideotrans.com/edgetts-api